
Few & Many · Strategy board game
How to play Few & Many
Two uneven armies, two battles, one board. Choose a setting to read its rules, with the same diagrams as the in-game rulebook.
Deepstone
Miners against Golems: 32 light, quick pieces against 8 heavy ones. Neither side plays anything like the other.
A match is two battles. You take one army, then the other, and the points from both decide it — so being good with one army is only half of it.
Goal: preserve your army while taking the opponent's pieces. Miners slide any distance along an empty straight or diagonal line. A line of miners throws its front miner along the line onto a golem, up to one square per miner. A golem steps one square and may take one adjacent miner, or none. A line of at least two golems may barge onto an empty square and take every adjacent miner. Ore blocks movement and scores nothing. Each surviving miner is 1 point; each golem is 4. Both armies can score 32. Build lines with miners and watch for area captures.
Your first turn
The many move first. Tap a piece of the army whose turn it is, then a highlighted destination. Dots mark ordinary moves; rings mark captures. If several moves reach the same square, choose the capture or the move without a capture from the list. Hold a destination to preview exactly which pieces it takes. Tap the sheep or fruit itself to drive or pull it. Each move, capture, fire or pull uses one turn. The 2D/3D button switches the board view. In 3D, drag to pan and pinch to zoom; unlock the camera to rotate. Undo takes back a turn (and the computer reply when playing against it). Menu saves your match; Resume returns to it. Start with Beginner or the guided Lessons to practise.
The board
165 squares. The ore stands at the centre and never moves. Nothing may land on it or pass through it.
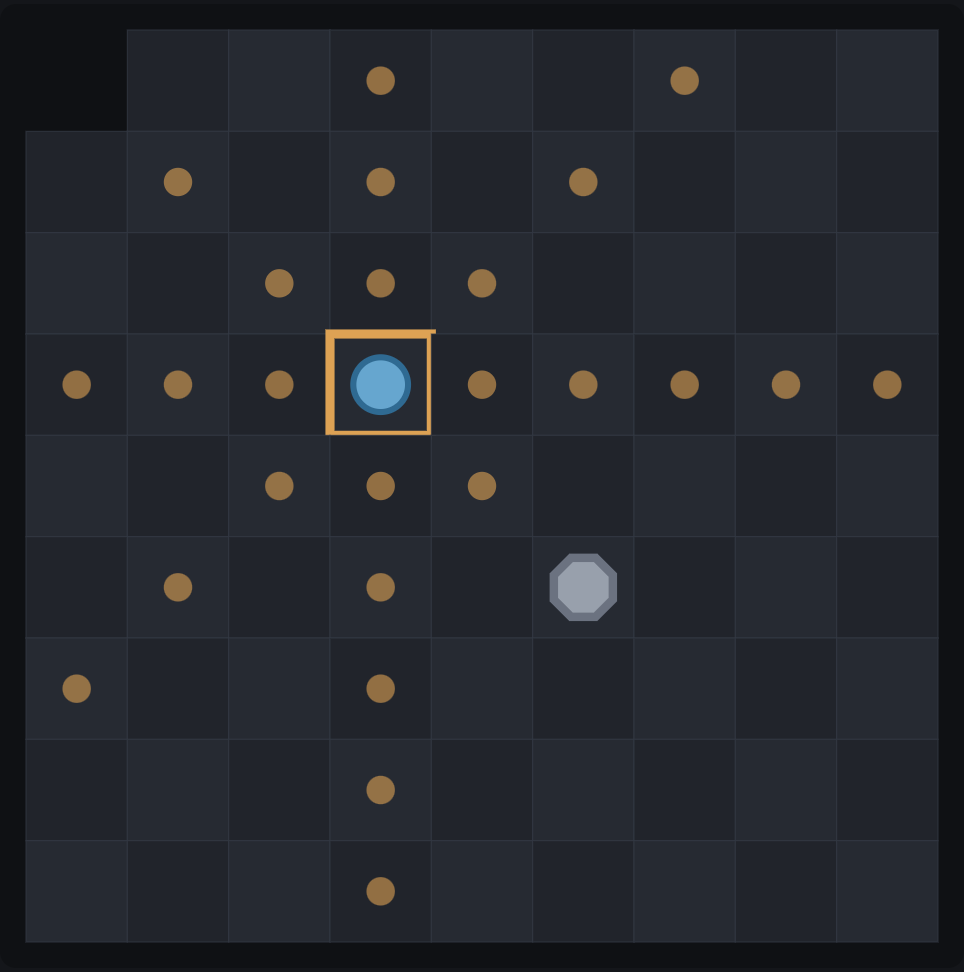
The miners move like a queen
One miner slides any distance you like — straight or diagonal — but never onto or through another piece.
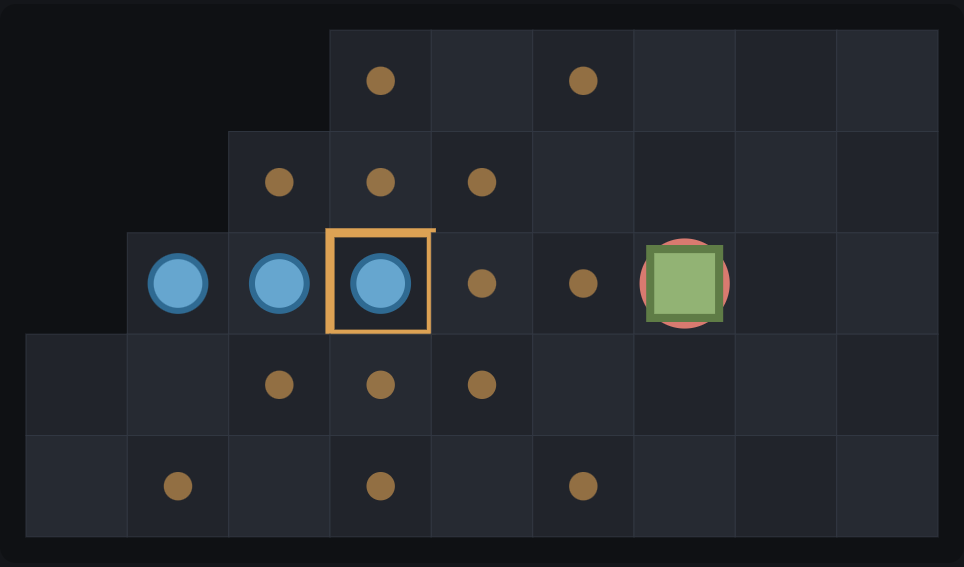
Heave
The miners at the back heave the one at the front clean off his feet.
Wherever miners stand in a straight line, the one at the front may be thrown along that line — as many squares as there are miners in it. It must land on a golem, which is taken. A lone miner counts as a line of one, so it can always take a golem standing right beside it.
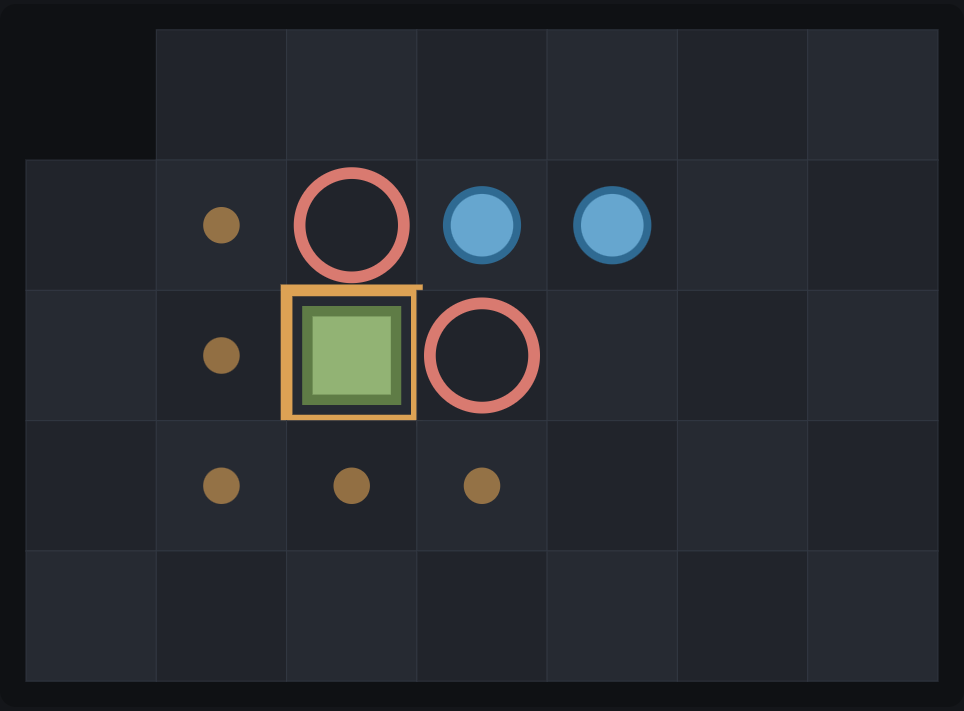
The golems move one square
A golem steps a single square in any direction, onto an empty one. Having moved, it may take exactly one miner standing beside it — or none at all. The choice is yours.
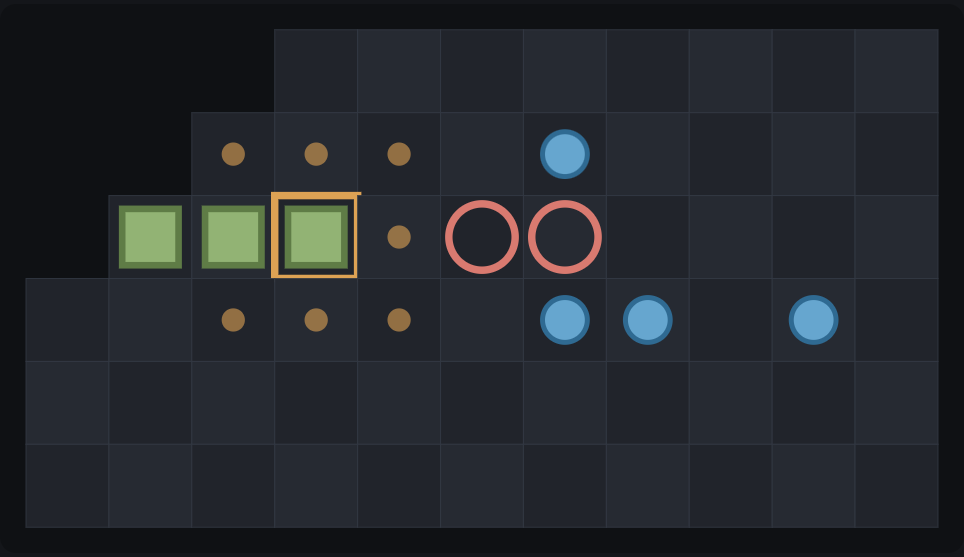
Grind
A golem grinds forward and everything beside it is rubble.
Wherever golems stand in a straight line, the one at the end may be driven along it — again, as many squares as there are golems in the line. It must land on an empty square, and it then takes every miner around where it lands. It is only allowed if it takes at least one.
It takes two or more in the line. Unlike a lone miner, a lone golem is not a line: on its own it can only step, and take one.
Ending a battle, and scoring
A battle ends when an objective is reached, the next player has no legal move, or 100 consecutive turns pass without a capture. You can also confirm End battle to score the current position. Surviving pieces and the objective determine the points.
| Miners | 1 point a piece · the many |
|---|---|
| Golems | 4 points a piece · the few |
Both armies top out at the same number of points, which is what keeps two such different sides level. Swap sides, play the second battle, and the higher total wins the match.
Glossary
- Line
- Two or more of your pieces standing next to each other in a straight row — across, down, or diagonal.
- Heave
- A miner thrown along its line onto a golem. Reaches as far as the line is long.
- Grind
- A golem driven along its line onto an empty square, taking every miner beside it. Only legal if it takes one.
- Step
- The ordinary move of a golem: one square, then optionally one miner beside it.
- The ore
- The obstacle at the centre of the board. It never moves and blocks everything.
- Battle
- One playthrough on the board. Two of them make a match.
- Match
- Two battles with the sides swapped. The points from both decide the winner.
Everything above is enforced by the game itself — the diagrams on this page are real positions, and the moves they show are the moves the rules allow.
With thanks
Few & Many is an original game, but it does not pretend to be an original idea. Its shape — many weak pieces against a few strong ones, played twice with the sides swapped — comes from Thud, designed by Trevor Truran in 2002 and set in Terry Pratchett's Discworld. Thud in turn descends from hnefatafl, which people have been playing for something like a thousand years.
Every board, army, rule and word here is ours. The debt is not, and it is a pleasure to record it.
Fold & Fang
Wolves against Shepherds: 16 light, quick pieces against 8 heavy ones. Neither side plays anything like the other.
A match is two battles. You take one army, then the other, and the points from both decide it — so being good with one army is only half of it.
Goal: wolves drive the sheep to the marked far edge; shepherds surround it with at least three shepherds after their own turn. Wolves slide any distance and capture by sandwiching a shepherd between the arriving wolf and another wolf. Shepherds move up to two squares along an empty line without capturing, or jump over one adjacent wolf to the empty square beyond and capture it. Each jump is one turn; jumps cannot be chained. No throws or barges. To drive, tap the sheep: it must be next to a wolf before and after its one-square move. Wolves can break a ring that forms on their own turn before the shepherds move. Surviving wolves score 1 each, shepherds 2 each, plus 16 for achieving your objective; maximum 32 per army.
Your first turn
The many move first. Tap a piece of the army whose turn it is, then a highlighted destination. Dots mark ordinary moves; rings mark captures. If several moves reach the same square, choose the capture or the move without a capture from the list. Hold a destination to preview exactly which pieces it takes. Tap the sheep or fruit itself to drive or pull it. Each move, capture, fire or pull uses one turn. The 2D/3D button switches the board view. In 3D, drag to pan and pinch to zoom; unlock the camera to rotate. Undo takes back a turn (and the computer reply when playing against it). Menu saves your match; Resume returns to it. Start with Beginner or the guided Lessons to practise.
The board
165 squares. The sheep starts at the centre, and can be driven — see below. Nothing may land on it or pass through it.
The wolves move like a queen
One wolf slides any distance you like — straight or diagonal — but never onto or through another piece.
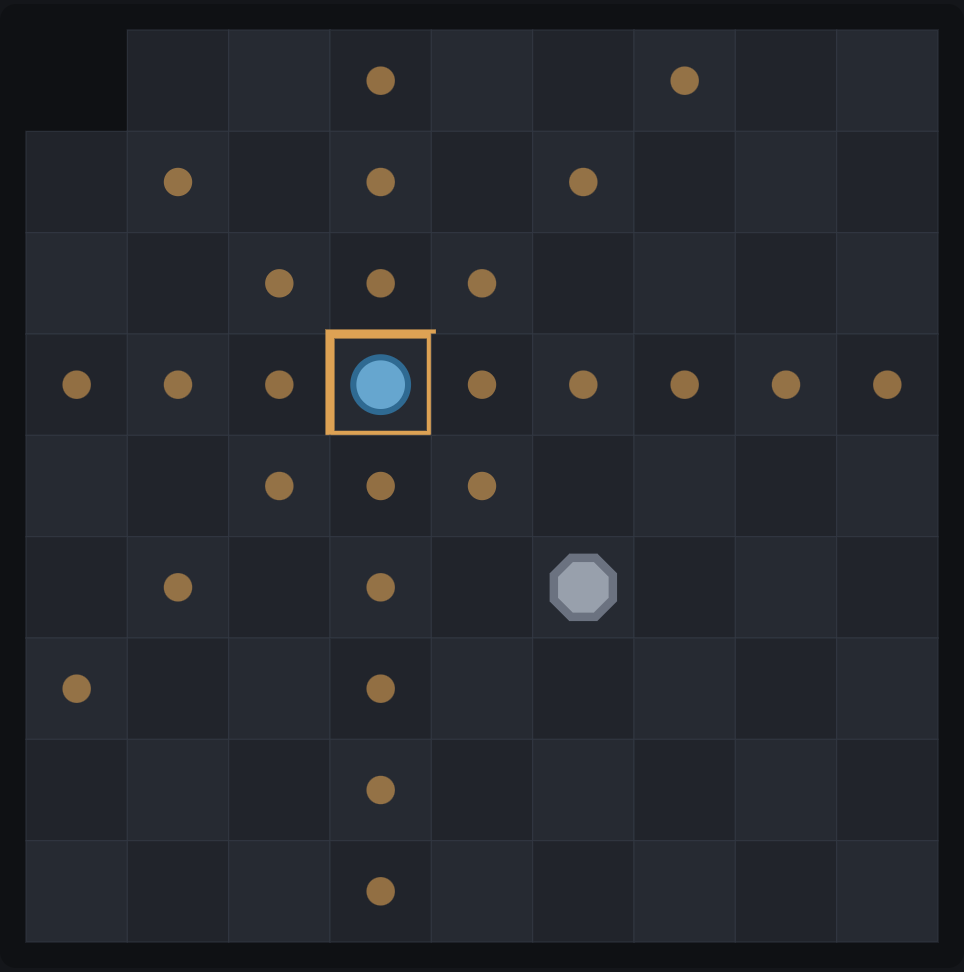
Snare
Two wolves close from opposite sides and the shepherd between them is caught.
A wolf takes by trapping. Slide one so that a shepherd is caught in a straight line between it and another wolf, and that shepherd is taken. One arrival can trap more than one.
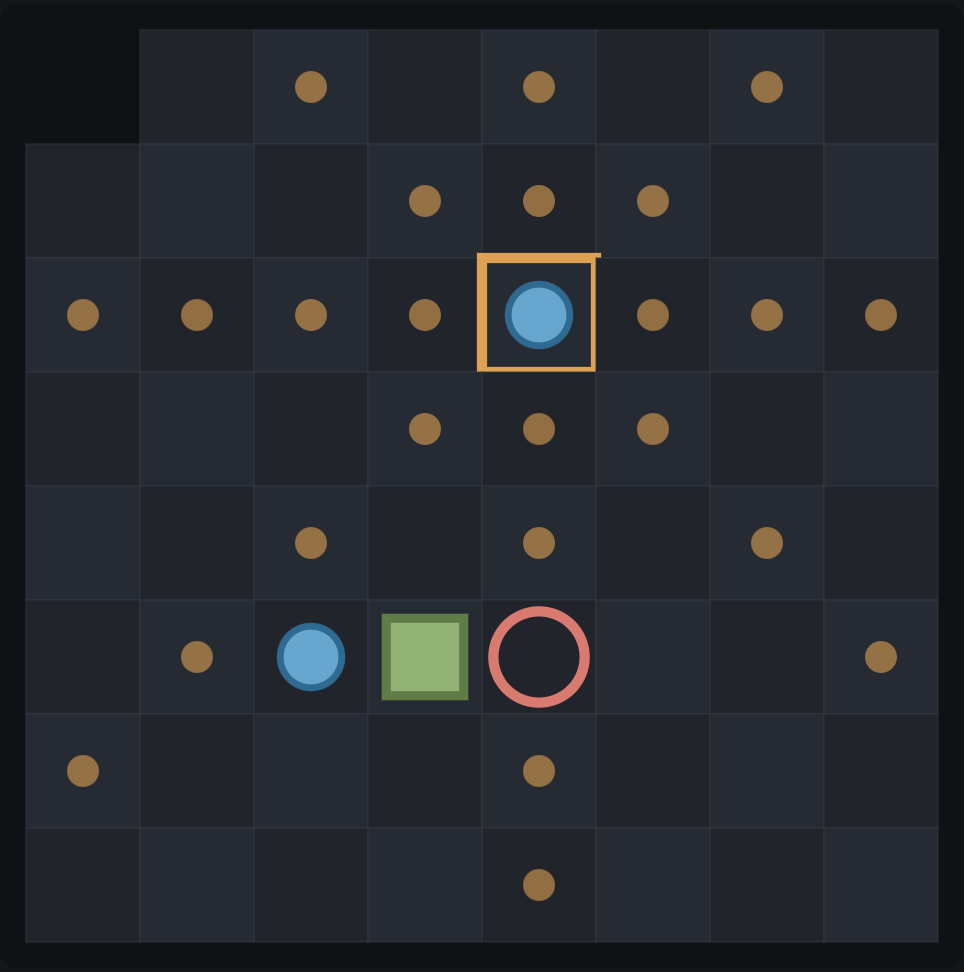
The shepherds move
A shepherd moves up to 2 squares in a straight or diagonal line onto an empty square. It cannot pass through pieces. This move captures nothing.
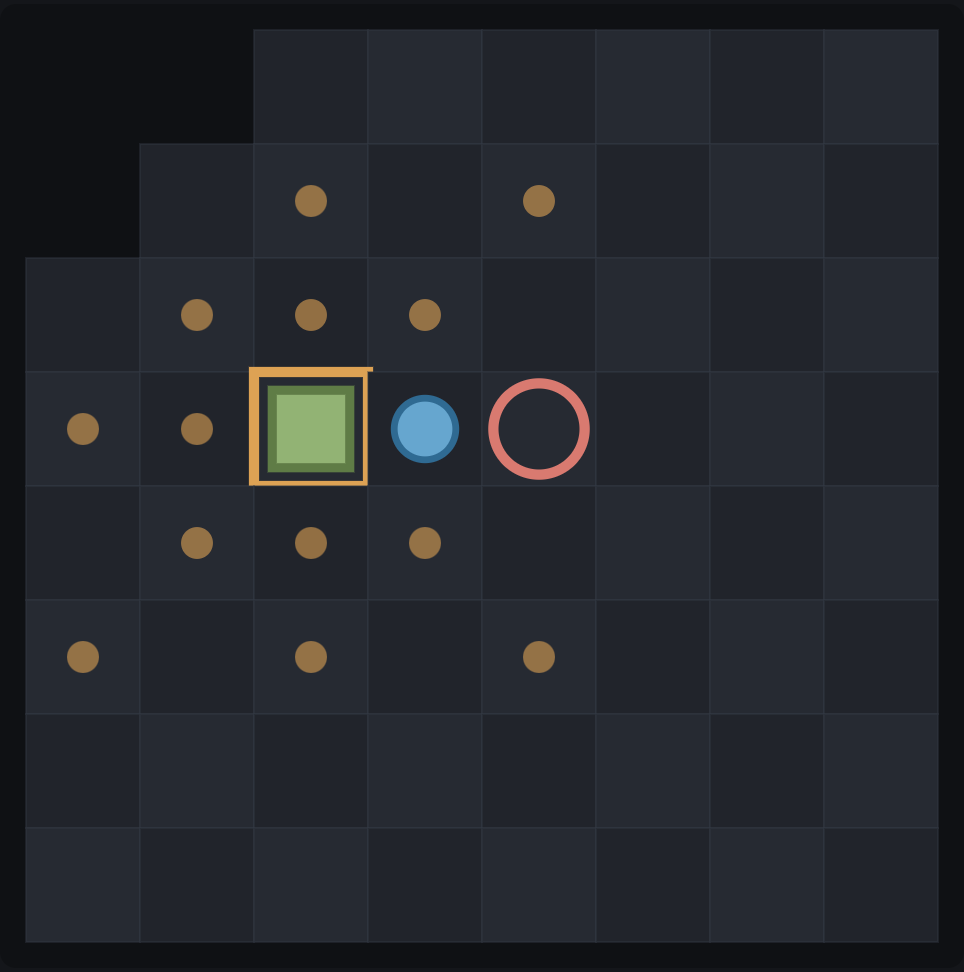
Vault
A shepherd plants his crook and vaults clean over the wolf in front of him.
From beside an wolf, a shepherd may jump straight over it and land on the empty square beyond. The wolf it jumped is taken. Two in a row cannot be jumped, and there must be room to land.
Driving the sheep
In this setting the sheep is not scenery. Instead of moving a wolf, the wolves may nudge the sheep one square — to any square that is still beside one of them. Walk the sheep onto the far edge, and the battle is theirs.
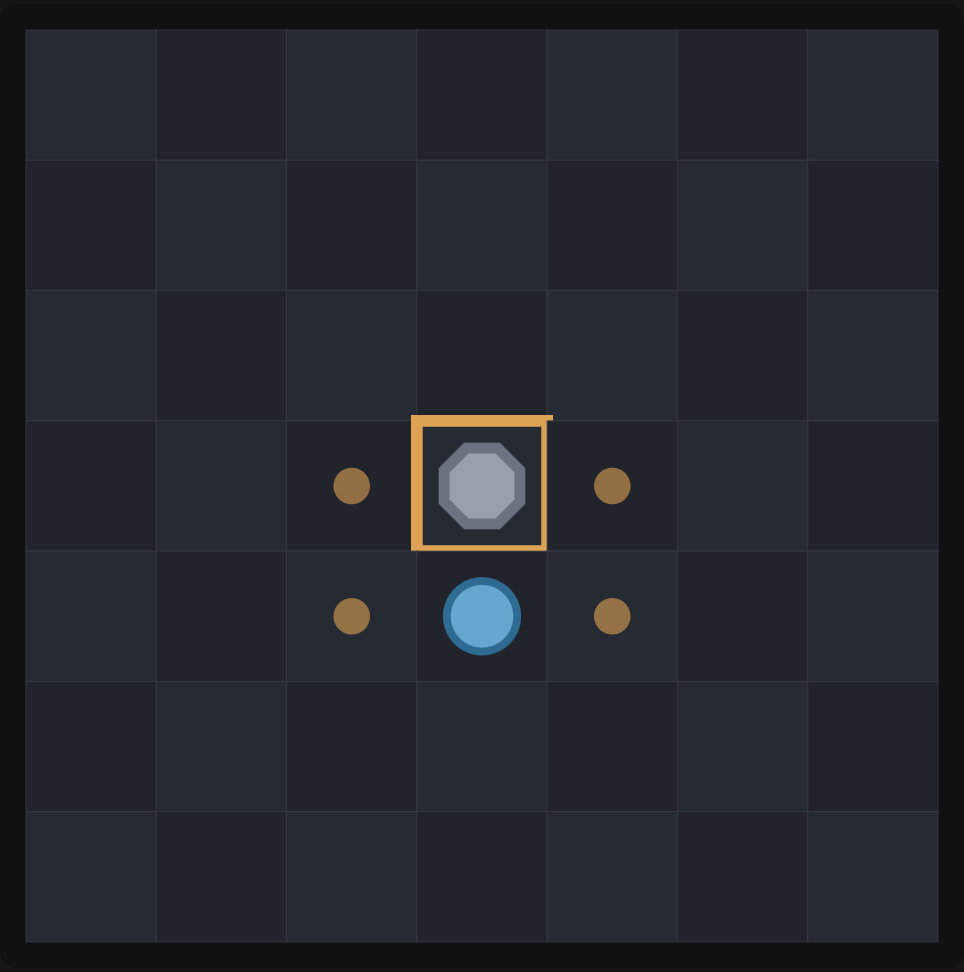
the shepherds win instead by getting three of their own around the sheep — but that only counts on their own move. Come to rest with the ring closed and the the wolves still get one turn to break it.
Ending a battle, and scoring
A battle ends when an objective is reached, the next player has no legal move, or 100 consecutive turns pass without a capture. You can also confirm End battle to score the current position. Surviving pieces and the objective determine the points.
| Wolves | 1 point a piece · the many |
|---|---|
| Shepherds | 2 points a piece · the few |
| The objective | 16 points · to whoever meets it |
Both armies top out at the same number of points, which is what keeps two such different sides level. Swap sides, play the second battle, and the higher total wins the match.
Glossary
- Line
- Two or more of your pieces standing next to each other in a straight row — across, down, or diagonal.
- Snare
- A shepherd caught in a line between two wolves, and taken for it. Never optional.
- Vault
- A shepherd jumping straight over one wolf onto the empty square beyond, taking it.
- Step
- The ordinary move of a shepherd: up to two squares, taking nothing.
- The sheep
- The prize. It blocks everything, and the wolves may walk it one square at a time.
- Battle
- One playthrough on the board. Two of them make a match.
- Match
- Two battles with the sides swapped. The points from both decide the winner.
Everything above is enforced by the game itself — the diagrams on this page are real positions, and the moves they show are the moves the rules allow.
With thanks
Few & Many is an original game, but it does not pretend to be an original idea. Its shape — many weak pieces against a few strong ones, played twice with the sides swapped — comes from Thud, designed by Trevor Truran in 2002 and set in Terry Pratchett's Discworld. Thud in turn descends from hnefatafl, which people have been playing for something like a thousand years.
Every board, army, rule and word here is ours. The debt is not, and it is a pleasure to record it.
The Nest
Ants against Beetles: 16 light, quick pieces against 8 heavy ones. Neither side plays anything like the other.
A match is two battles. You take one army, then the other, and the points from both decide it — so being good with one army is only half of it.
Goal: ants break the four eggs; beetles protect them through the two tunnel entrances. Ants slide any distance and can break an egg by landing on it, or throw onto it or a beetle along a line of ants. Beetles step one square and may take one adjacent ant; a line of at least two can barge and take every ant beside the landing square. Each surviving ant scores 1, each beetle 2. Each broken egg adds 4 to the ants; each intact egg adds 4 to the beetles. Breaking the last egg does not automatically end the battle. Both armies can score 32. Eggs are half the available score, so protect or attack the entrances instead of trading pieces aimlessly.
Your first turn
The many move first. Tap a piece of the army whose turn it is, then a highlighted destination. Dots mark ordinary moves; rings mark captures. If several moves reach the same square, choose the capture or the move without a capture from the list. Hold a destination to preview exactly which pieces it takes. Tap the sheep or fruit itself to drive or pull it. Each move, capture, fire or pull uses one turn. The 2D/3D button switches the board view. In 3D, drag to pan and pinch to zoom; unlock the camera to rotate. Undo takes back a turn (and the computer reply when playing against it). Menu saves your match; Resume returns to it. Start with Beginner or the guided Lessons to practise.
The board
89 squares. The eggs stands at the centre and never moves. Nothing passes through it. A ant may land on an egg and break it.
The ants move like a queen
One ant slides any distance you like — straight or diagonal — but never onto or through another piece.
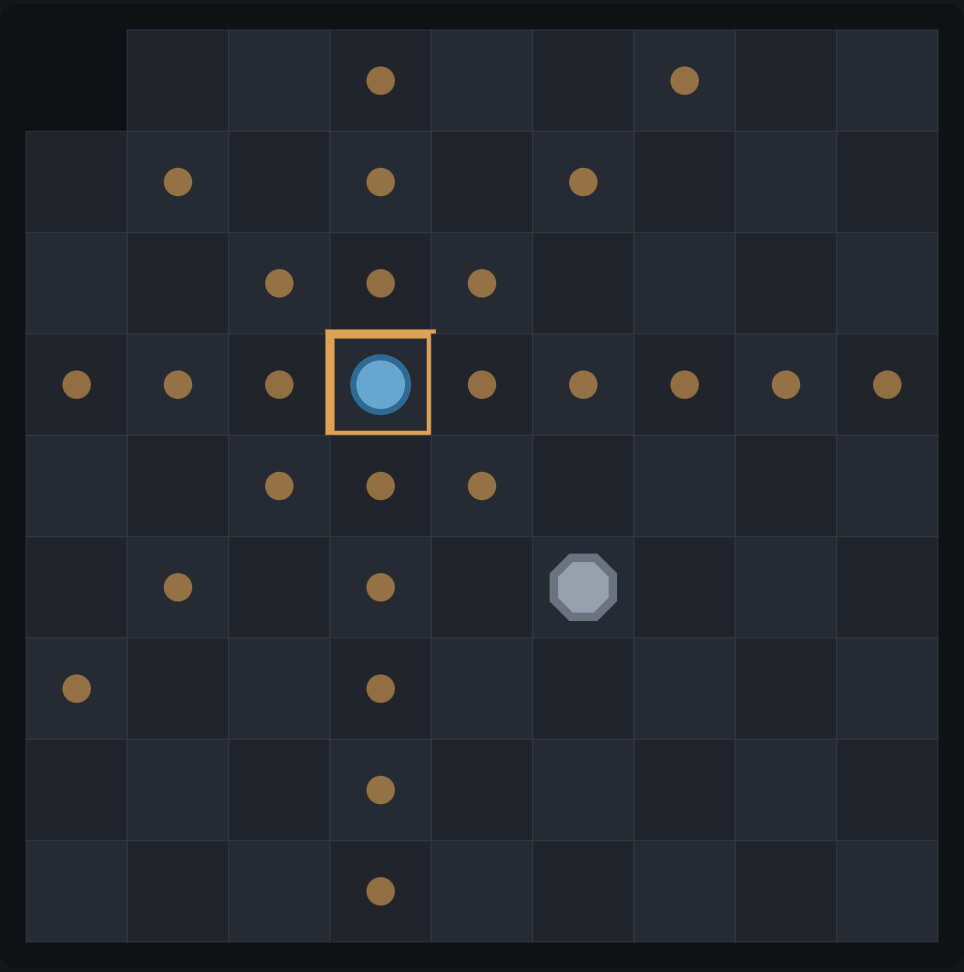
Swarm
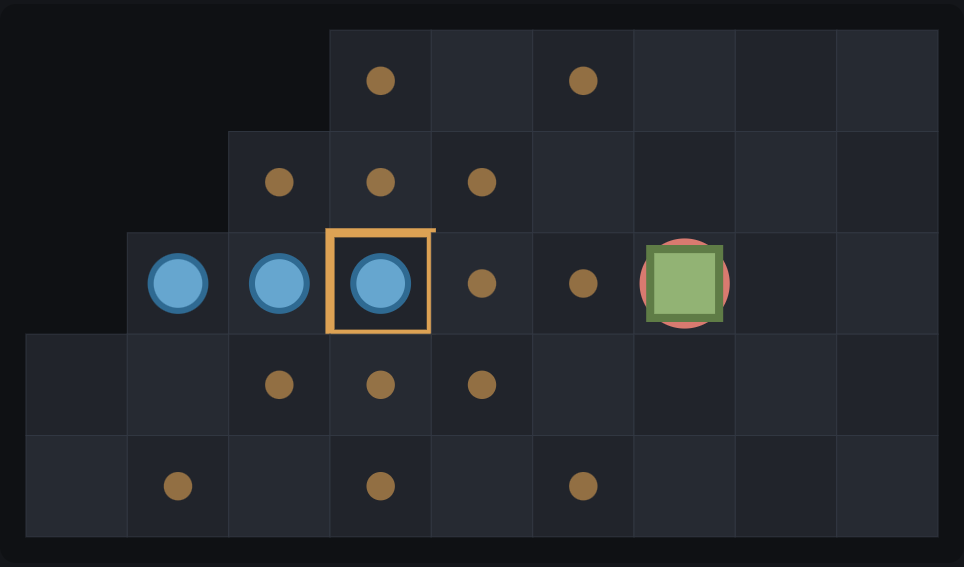
The column shoves its leader bodily onto a beetle's back.
Wherever ants stand in a straight line, the one at the front may be thrown along that line — as many squares as there are ants in it. It must land on a beetle, which is taken. A lone ant counts as a line of one, so it can always take a beetle standing right beside it.
The beetles move one square
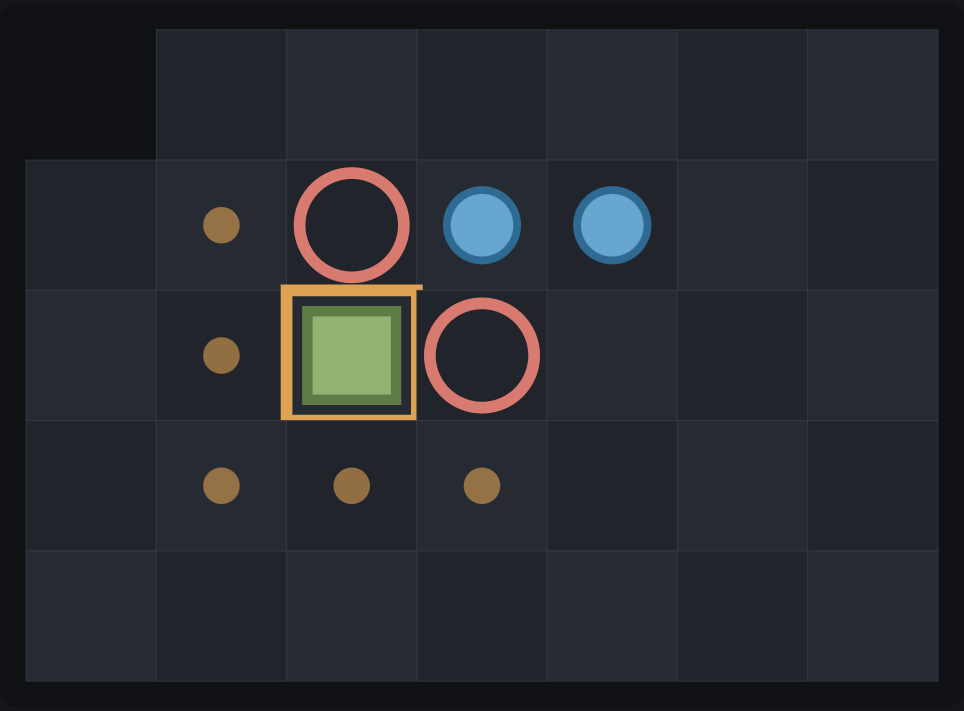
A beetle steps a single square in any direction, onto an empty one. Having moved, it may take exactly one ant standing beside it — or none at all. The choice is yours.
Trample
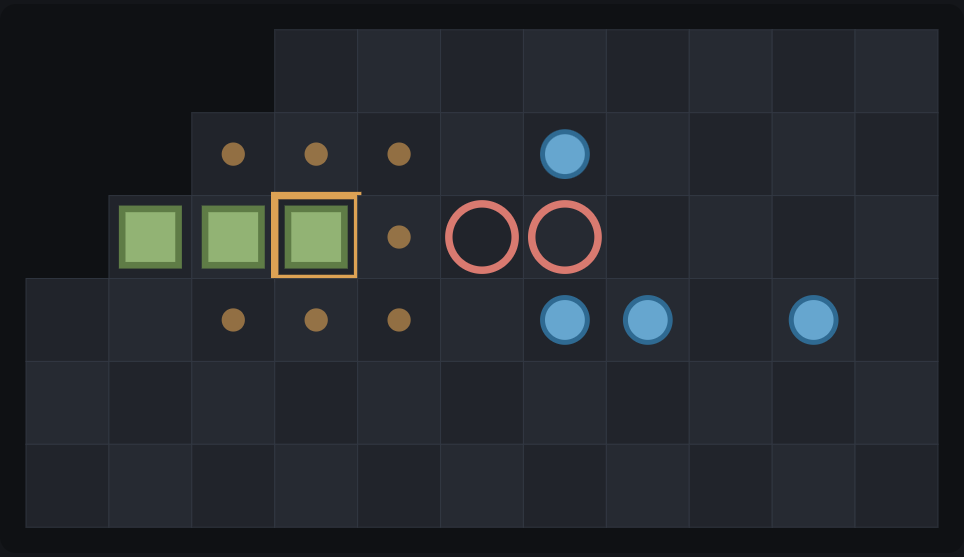
A beetle lurches forward and flattens every ant it lands among.
Wherever beetles stand in a straight line, the one at the end may be driven along it — again, as many squares as there are beetles in the line. It must land on an empty square, and it then takes every ant around where it lands. It is only allowed if it takes at least one.
It takes two or more in the line. Unlike a lone ant, a lone beetle is not a line: on its own it can only step, and take one.
Breaking the eggs
The eggs are the point of this setting, and they are fragile. An ant that reaches one breaks it — slide onto it like any other capture. A swarm breaks one too, and reaches further.
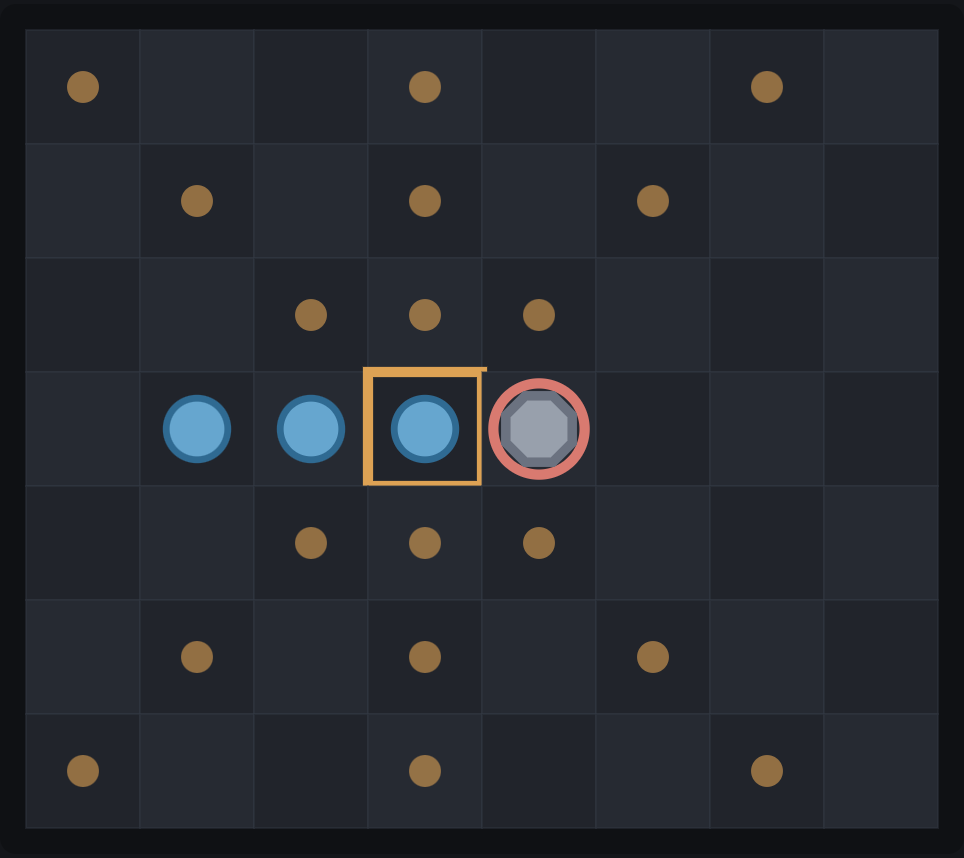
Each one destroyed scores 4 for the ants; each one still standing at the end scores 4 for the beetles.
Ending a battle, and scoring
A battle ends when an objective is reached, the next player has no legal move, or 100 consecutive turns pass without a capture. You can also confirm End battle to score the current position. Surviving pieces and the objective determine the points.
| Ants | 1 point a piece · the many |
|---|---|
| Beetles | 2 points a piece · the few |
| The eggs | 4 destroyed · 4 kept · each |
Both armies top out at the same number of points, which is what keeps two such different sides level. Swap sides, play the second battle, and the higher total wins the match.
Glossary
- Line
- Two or more of your pieces standing next to each other in a straight row — across, down, or diagonal.
- Swarm
- A ant thrown along its line onto a beetle. Reaches as far as the line is long.
- Trample
- A beetle driven along its line onto an empty square, taking every ant beside it. Only legal if it takes one.
- Step
- The ordinary move of a beetle: one square, then optionally one ant beside it.
- The eggs
- The obstacle at the centre of the board. It never moves and blocks everything.
- Battle
- One playthrough on the board. Two of them make a match.
- Match
- Two battles with the sides swapped. The points from both decide the winner.
Everything above is enforced by the game itself — the diagrams on this page are real positions, and the moves they show are the moves the rules allow.
With thanks
Few & Many is an original game, but it does not pretend to be an original idea. Its shape — many weak pieces against a few strong ones, played twice with the sides swapped — comes from Thud, designed by Trevor Truran in 2002 and set in Terry Pratchett's Discworld. Thud in turn descends from hnefatafl, which people have been playing for something like a thousand years.
Every board, army, rule and word here is ours. The debt is not, and it is a pleasure to record it.
The Long Vigil
Knights against Dragons: 32 light, quick pieces against 8 heavy ones. Neither side plays anything like the other.
A match is two battles. You take one army, then the other, and the points from both decide it — so being good with one army is only half of it.
Goal: knights get at least three knights next to the princess after a knight turn; dragons keep them away. Knights slide and throw along their own lines. Dragons step one square and may take one adjacent knight, or barge from a line of at least two. Instead of moving, a dragon may breathe fire in one straight or diagonal direction, taking every knight within three squares. Gaps do not block fire; another dragon or the princess does. Tap the dragon and a marked fire target to choose fire. Knights cannot land on the princess. Each surviving knight scores 1, each dragon 4, plus 16 to the side holding the princess. Dragons hold that bonus unless knights achieve the relief, including if the battle ends early. Maximum 48 per army. Approach from several directions instead of standing in a line of fire.
Your first turn
The many move first. Tap a piece of the army whose turn it is, then a highlighted destination. Dots mark ordinary moves; rings mark captures. If several moves reach the same square, choose the capture or the move without a capture from the list. Hold a destination to preview exactly which pieces it takes. Tap the sheep or fruit itself to drive or pull it. Each move, capture, fire or pull uses one turn. The 2D/3D button switches the board view. In 3D, drag to pan and pinch to zoom; unlock the camera to rotate. Undo takes back a turn (and the computer reply when playing against it). Menu saves your match; Resume returns to it. Start with Beginner or the guided Lessons to practise.
The board
165 squares. The princess waits at the far end and never moves. Nothing may land on it or pass through it.
The knights move like a queen
One knight slides any distance you like — straight or diagonal — but never onto or through another piece.
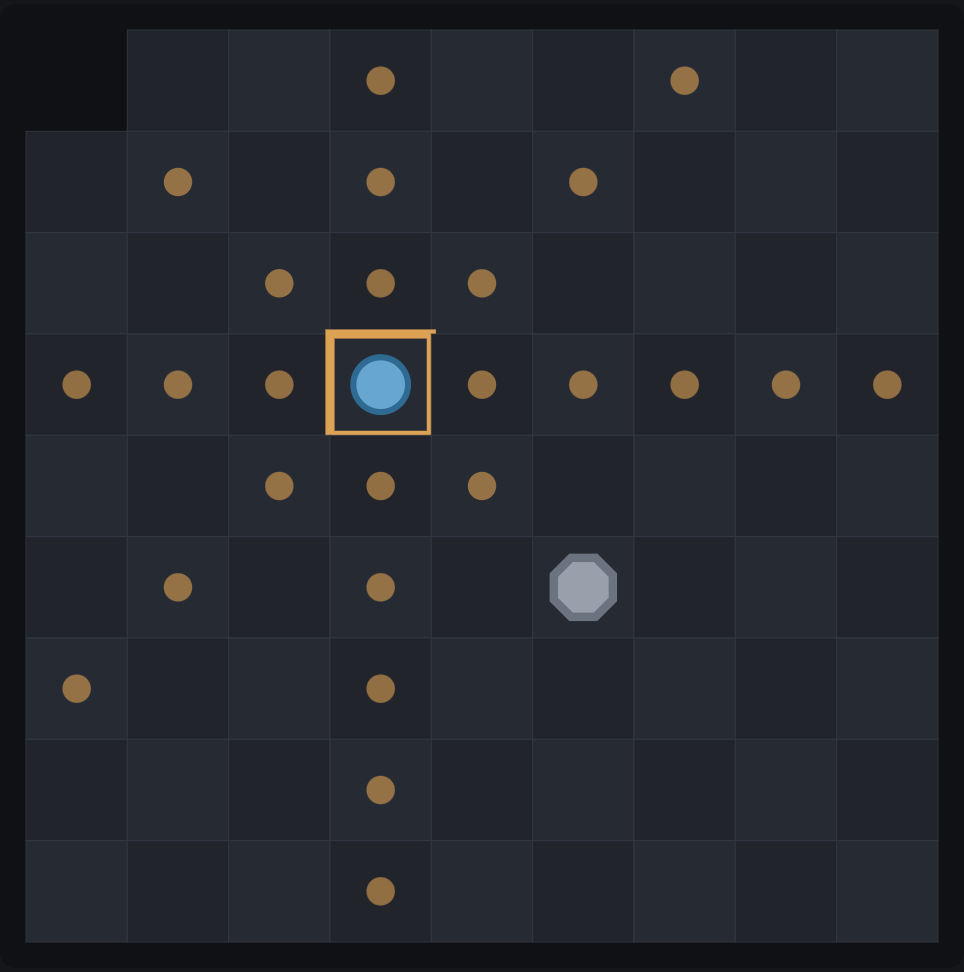
Charge
The rank behind spurs the front rider straight onto a dragon.
Wherever knights stand in a straight line, the one at the front may be thrown along that line — as many squares as there are knights in it. It must land on a dragon, which is taken. A lone knight counts as a line of one, so it can always take a dragon standing right beside it.
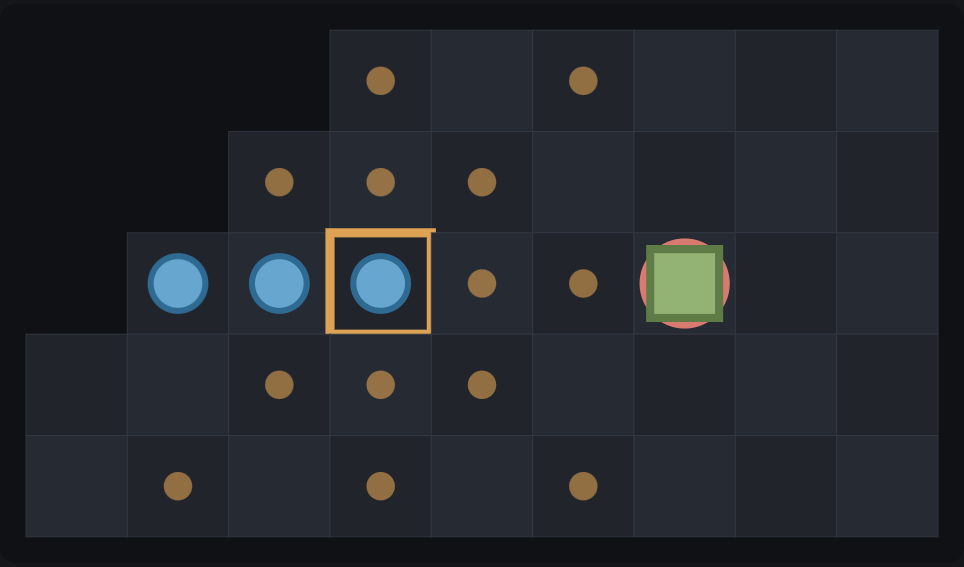
The dragons move one square
A dragon steps a single square in any direction, onto an empty one. Having moved, it may take exactly one knight standing beside it — or none at all. The choice is yours.
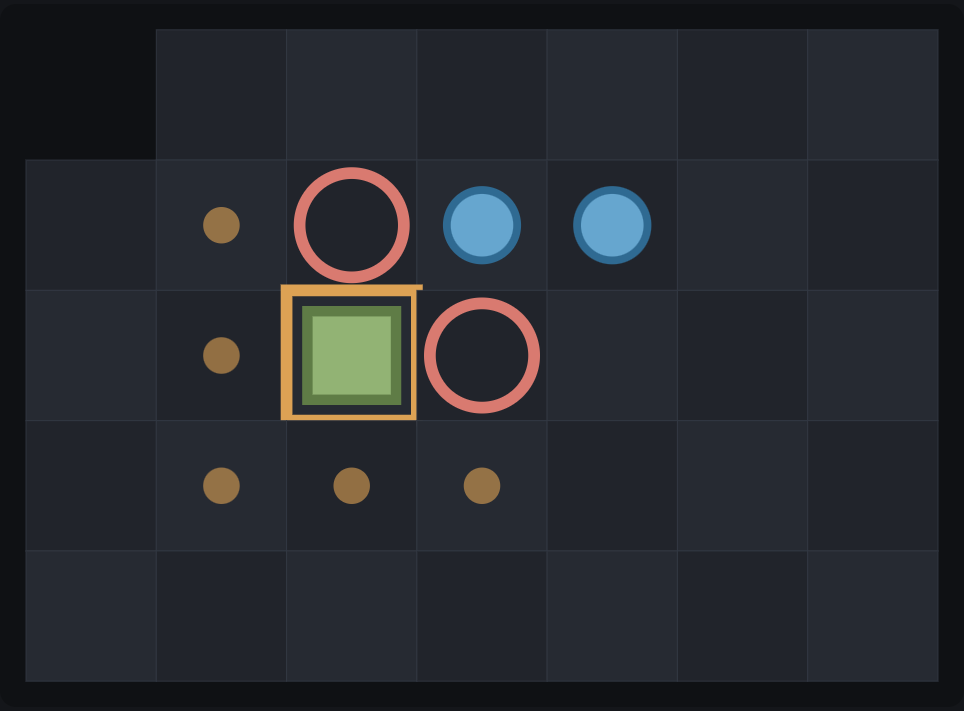
Sweep
A dragon shoulders through and its tail sweeps the ground clear.
Wherever dragons stand in a straight line, the one at the end may be driven along it — again, as many squares as there are dragons in the line. It must land on an empty square, and it then takes every knight around where it lands. It is only allowed if it takes at least one.
It takes two or more in the line. Unlike a lone knight, a lone dragon is not a line: on its own it can only step, and take one.
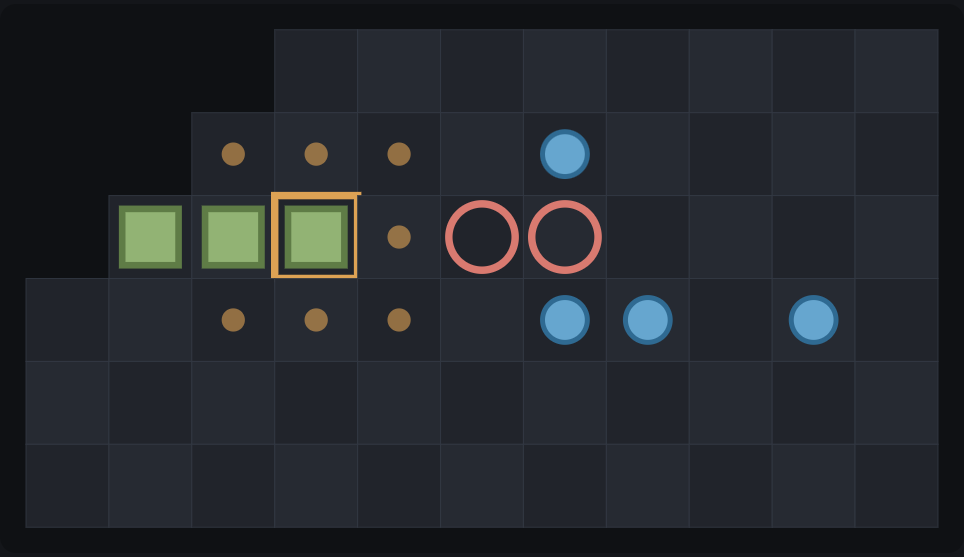
The dragons breathe fire
Instead of moving, a dragon may burn every knight in a straight line within three squares. A gap does not stop it; another dragon, the princess, or the edge of the board does.
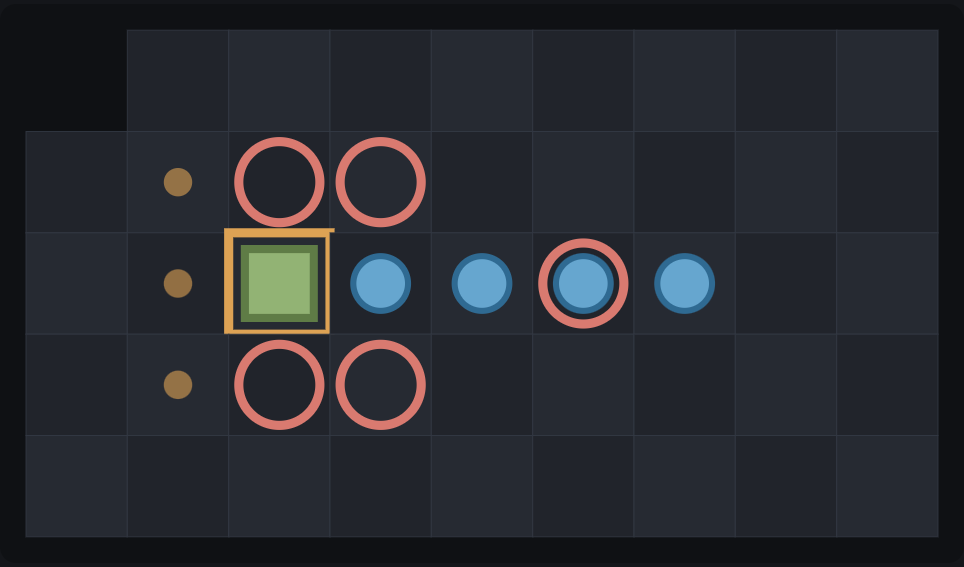
the knights win by getting three of their own beside the princess, and the dragons win by keeping them off.
Ending a battle, and scoring
A battle ends when an objective is reached, the next player has no legal move, or 100 consecutive turns pass without a capture. You can also confirm End battle to score the current position. Surviving pieces and the objective determine the points.
| Knights | 1 point a piece · the many |
|---|---|
| Dragons | 4 points a piece · the few |
| The objective | 16 points · to whoever meets it |
Both armies top out at the same number of points, which is what keeps two such different sides level. Swap sides, play the second battle, and the higher total wins the match.
Glossary
- Line
- Two or more of your pieces standing next to each other in a straight row — across, down, or diagonal.
- Charge
- A knight thrown along its line onto a dragon. Reaches as far as the line is long.
- Sweep
- A dragon driven along its line onto an empty square, taking every knight beside it. Only legal if it takes one.
- Step
- The ordinary move of a dragon: one square, then optionally one knight beside it.
- The princess
- The obstacle at the centre of the board. It never moves and blocks everything.
- Battle
- One playthrough on the board. Two of them make a match.
- Match
- Two battles with the sides swapped. The points from both decide the winner.
Everything above is enforced by the game itself — the diagrams on this page are real positions, and the moves they show are the moves the rules allow.
With thanks
Few & Many is an original game, but it does not pretend to be an original idea. Its shape — many weak pieces against a few strong ones, played twice with the sides swapped — comes from Thud, designed by Trevor Truran in 2002 and set in Terry Pratchett's Discworld. Thud in turn descends from hnefatafl, which people have been playing for something like a thousand years.
Every board, army, rule and word here is ours. The debt is not, and it is a pleasure to record it.
Bough & Bellow
Monkeys against Gorillas: 32 light, quick pieces against 8 heavy ones. Neither side plays anything like the other.
A match is two battles. You take one army, then the other, and the points from both decide it — so being good with one army is only half of it.
Goal: pull the fruit to your army's marked end of the hourglass. Monkeys slide any distance and capture by throwing along a line of monkeys. Gorillas step one square and may take one adjacent monkey, or none. Gorillas cannot barge. A monkey within three squares of the fruit adds 4 grip; an adjacent gorilla adds 5. Only strictly greater grip allows a pull; equal grip means no pull. Tap the fruit to pull it one square toward your goal instead of moving a piece. Two monkeys out-grip one gorilla, but more gorillas change the total. Each surviving monkey scores 1, each gorilla 4, plus 16 for reaching your goal; maximum 48 per army. Keep monkeys supporting the rope without exposing them to a gorilla's next step.
Your first turn
The many move first. Tap a piece of the army whose turn it is, then a highlighted destination. Dots mark ordinary moves; rings mark captures. If several moves reach the same square, choose the capture or the move without a capture from the list. Hold a destination to preview exactly which pieces it takes. Tap the sheep or fruit itself to drive or pull it. Each move, capture, fire or pull uses one turn. The 2D/3D button switches the board view. In 3D, drag to pan and pinch to zoom; unlock the camera to rotate. Undo takes back a turn (and the computer reply when playing against it). Menu saves your match; Resume returns to it. Start with Beginner or the guided Lessons to practise.
The board
129 squares. The fruit starts in the neck and can be pulled by either army. Nothing may land on it or pass through it.
The monkeys move like a queen
One monkey slides any distance you like — straight or diagonal — but never onto or through another piece.
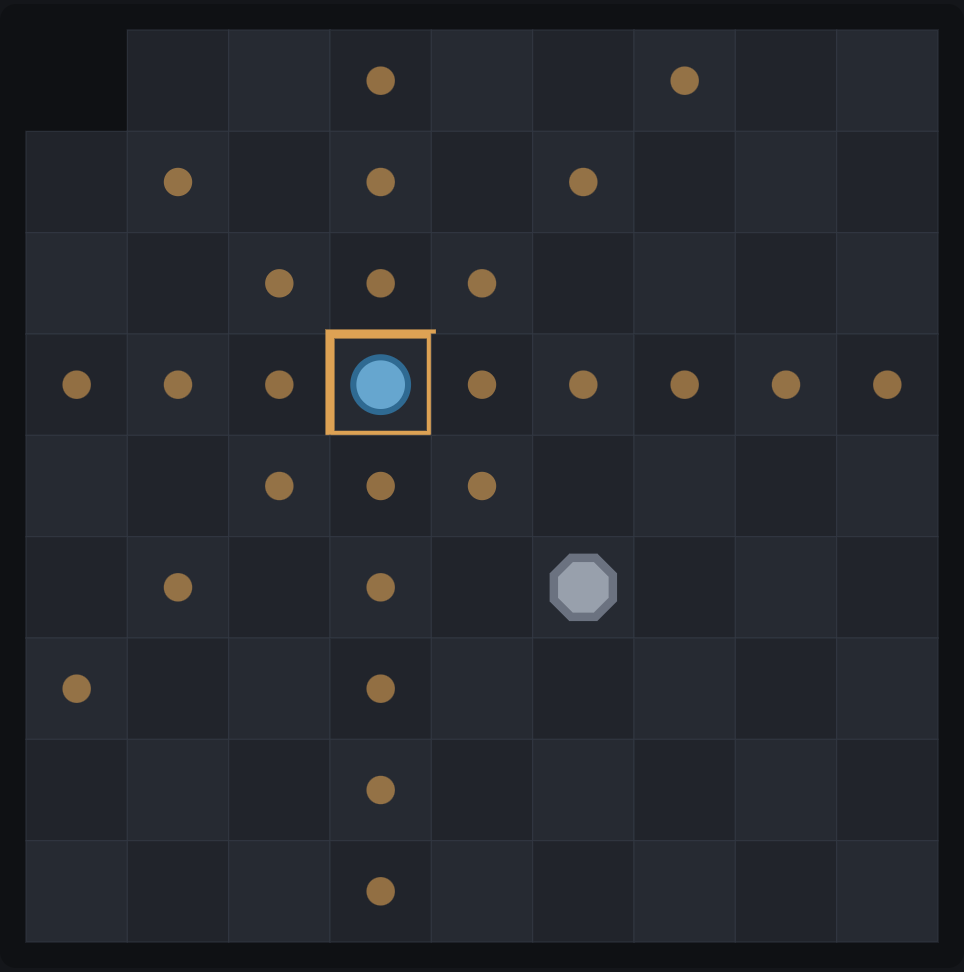
Fling
The troop behind hurls the front monkey bodily onto a silverback.
Wherever monkeys stand in a straight line, the one at the front may be thrown along that line — as many squares as there are monkeys in it. It must land on a gorilla, which is taken. A lone monkey counts as a line of one, so it can always take a gorilla standing right beside it.
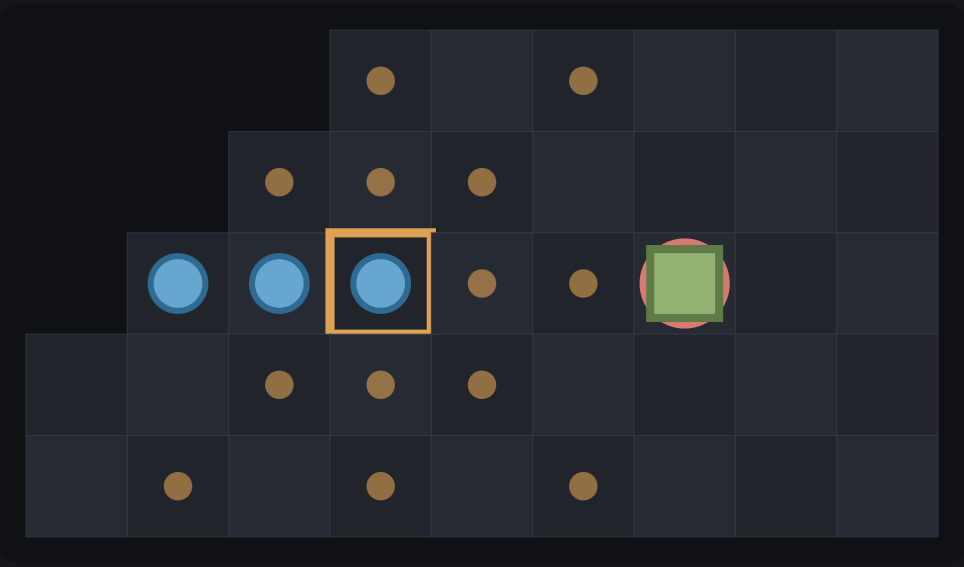
The gorillas move one square
A gorilla steps a single square in any direction, onto an empty one. Having moved, it may take exactly one monkey standing beside it — or none at all. The choice is yours.
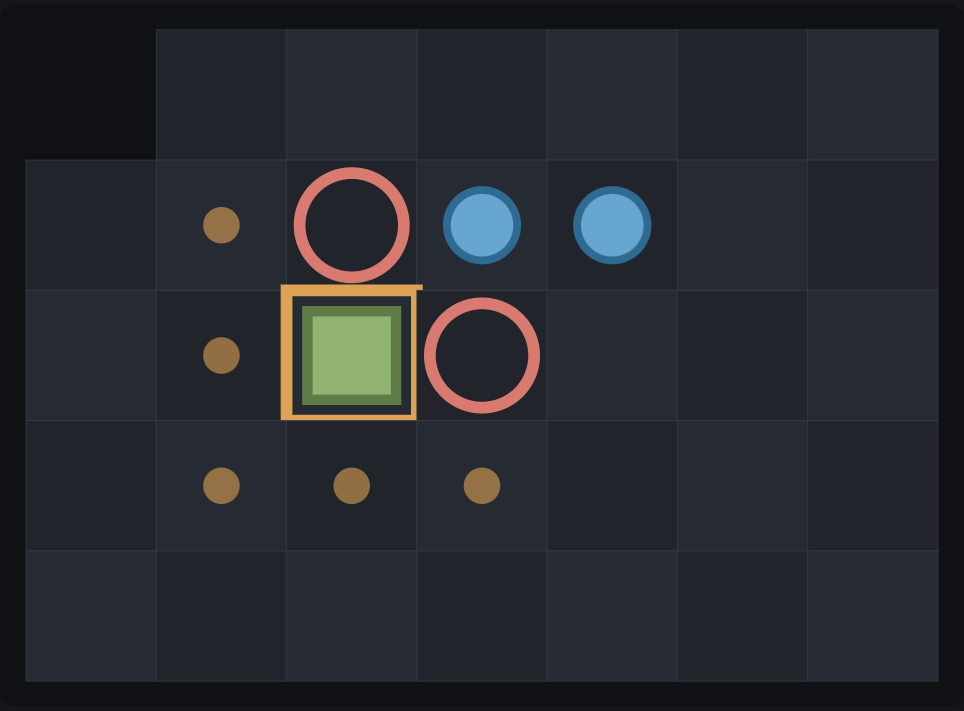
the gorillas cannot barge in this mode: each move can take at most one neighbouring piece.
The rope
Here the fruit belongs to nobody, and both armies want it — at opposite ends of the board. Instead of moving a piece, the side with the stronger grip may drag the fruit one square toward its own end.
A gorilla counts 5, but only with a hand on it — on one of the eight squares beside the fruit. A monkey counts 4from up to three squares away, strung out behind the rope. Only a side with *more* grip than the other may pull, so an even rope moves nothing.
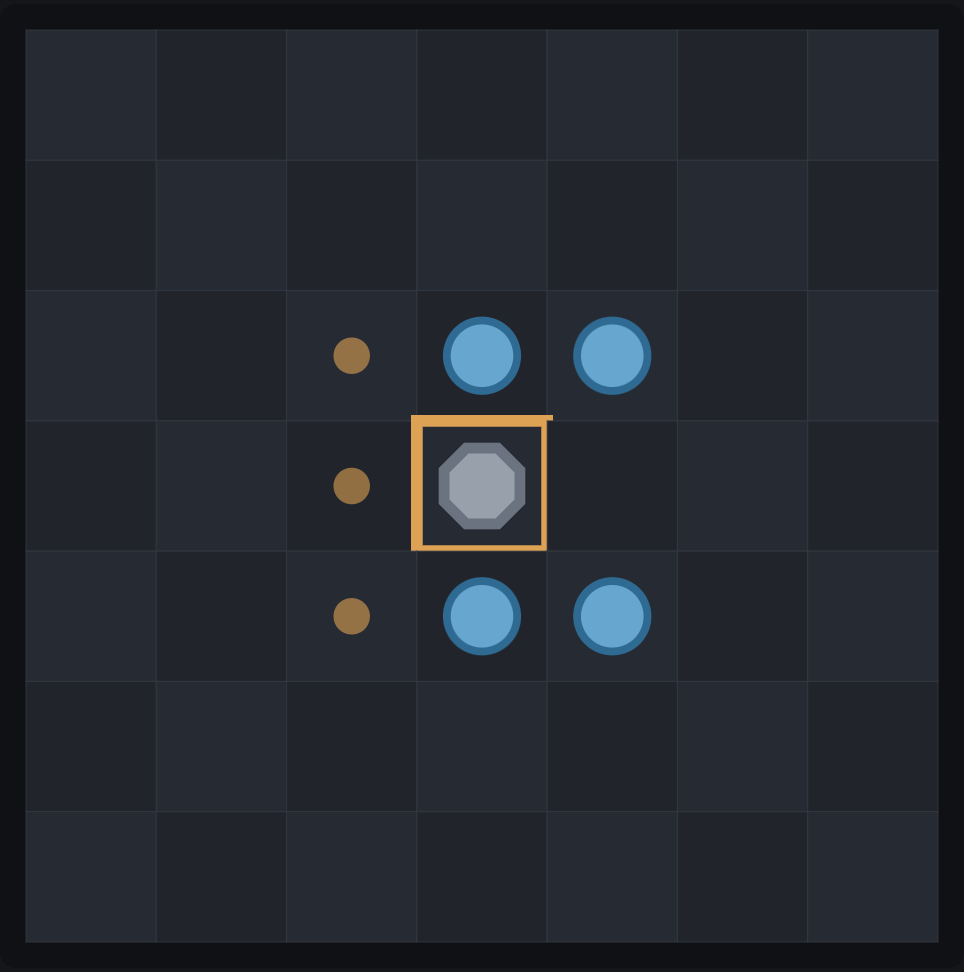
That is why the monkeys being far quicker does not simply win. It takes two of them to out-grip a single gorilla, and every one standing beside a gorilla can be taken. Speed buys the monkeys the choice of where the fight happens. It does not buy them the fight.
Ending a battle, and scoring
A battle ends when an objective is reached, the next player has no legal move, or 100 consecutive turns pass without a capture. You can also confirm End battle to score the current position. Surviving pieces and the objective determine the points.
| Monkeys | 1 point a piece · the many |
|---|---|
| Gorillas | 4 points a piece · the few |
| The objective | 16 points · to whoever meets it |
Both armies top out at the same number of points, which is what keeps two such different sides level. Swap sides, play the second battle, and the higher total wins the match.
Glossary
- Line
- Two or more of your pieces standing next to each other in a straight row — across, down, or diagonal.
- Fling
- A monkey thrown along its line onto a gorilla. Reaches as far as the line is long.
- Step
- The ordinary move of a gorilla: one square, then optionally one monkey beside it.
- The fruit
- The prize. Either army may drag it toward its own end, if it has the stronger grip.
- Battle
- One playthrough on the board. Two of them make a match.
- Match
- Two battles with the sides swapped. The points from both decide the winner.
Everything above is enforced by the game itself — the diagrams on this page are real positions, and the moves they show are the moves the rules allow.
With thanks
Few & Many is an original game, but it does not pretend to be an original idea. Its shape — many weak pieces against a few strong ones, played twice with the sides swapped — comes from Thud, designed by Trevor Truran in 2002 and set in Terry Pratchett's Discworld. Thud in turn descends from hnefatafl, which people have been playing for something like a thousand years.
Every board, army, rule and word here is ours. The debt is not, and it is a pleasure to record it.